Tag Archives: wordpress

Hiding the Editor Part 2

A previous post explained how to hide the WordPress editor for custom post types.

I just noticed that this no longer works in WordPress 3.3.1. It looks like the CSS Ids have changed for the editor. The whole editor is now enclosed by a div with the id ‘postdivrich’.

Thus the hide_editor() function now reads as below. Much simpler.

	function hide_editor() {
		?>
			<style>
				#postdivrich {display:none;}
			</style>
		<?php
	}

Quarterly Programme Page

The weekly programme for the site I’m working on is released every quarter as a Microsoft Word file with a table. The challenge is how to keep it updated with a minimum of fuss. I considered various approaches like manually typing it out into a table, or even creating a gigantic admin page of metaboxes for each of the weeks in a quarter.

The problem with the metaboxes approach is that the number of weeks in each quarter is not constant. Some months will have five weeks, or there may be special services which require more entries.

Being lazy, I decided to try just selecting the data and copying it into the editor window of a page to see what happens. It didn’t quite work out when using Google Docs as all the formatting was lost, but saving the document first then using the paste from Word feature in the Visual Editor worked fine.

There were some extra newlines and paragraphs, probably due to extra whitespace in the original document, but it was not too tedious to remove these manually.

With the content in the right place, it was time to make it look nice. The default padding for table data in the Twenty Ten theme was way too much, making some of the cells too fat, and the borders were faint gray lines which can’t be seen.This was easily fixed by adding the following CSS code to the theme stylesheet.

#content tr td {
    padding: 6px 12px;
    border: 1px solid #000000;
}

Custom Post Type Archives jQuery Accordion

As more and more past entries are migrated over to the WordPress site, the year/month drop down list for the archives will get longer and longer.

It’s much cooler to show a list of the years, then when a year is clicked, it slides open to show links to the months. Turns out this can be done with a jQuery accordion.

Modifying HTML Markup

The wp_get_archives() function returns an unordered list in HTML with links to every year-month with an entry. This will have to be parsed and modified so that the years are added as headings.

The basic approach is to use a regular expression to get an array of all the years, then count how many times each year appears. These numbers will be used later to count the number of entries before a year heading should be added.


//get an array of all the years
	//the generated html is in reverse chronological order
	//this can be used to determine when to insert a year header
	preg_match_all("|<li><a .*>.*([0-9]{4}).*</a></li>|", $html, $out, PREG_PATTERN_ORDER);

	$html = "";
	$year_counts = array();

	//counts the number of months with archives for each year
	foreach ( $out[1] as $entry ) {
		if ( isset( $year_counts[ $entry ] ) ) {		//increment count for the year
			$year_counts[ $entry ] = $year_counts[ $entry ] + 1;
		}
		else {
			$year_counts[ $entry ] = 1;					//1st time this year is encountered
		}
	}

	$years = array_keys( $year_counts );
	$counts = array_values( $year_counts );
	$i = 0;
	$k = 0;

	foreach ( $years as $year ) {
		$html .= '<h3>' . $year . '</h3><ul>';		//create a heading for each year
		for ( $j = 0; $j < $counts[ $i ]; $j++) {		//create an entry for each month in the year
			$html .= $out[ 0 ][ $k ];
			$k++;
		}
		$i++;
		$html .= '</ul>';
	}

It is also necessary to wrap the entire thing in <div> tags with an ID of ‘accordion’.

jQuery Javascript Code

jQuery(document).ready(function() {
				jQuery("#accordion").accordion({
					autoHeight: false,
					collapsible: true
				});
			});

Save this bit of code as a js file.

Including the Scripts

Download the jQuery accordion script from the website. This script and the one written in the previous section must both be included into the WordPress environment. wp_enqueue_script() should be used for this.

function enqueue_accordion_script() {
	wp_register_script( 'enqueue-accordion-script', get_stylesheet_directory_uri() . '/scripts/jquery-ui-1.8.13.custom.min.js',
						array( 'jquery' ) );
	wp_enqueue_script( 'enqueue-accordion-script' );
}

add_action( 'init', 'enqueue_accordion_script' );

function add_jquery_accordion() {
	wp_enqueue_script( 'add-jquery-accordion', get_stylesheet_directory_uri() . '/scripts/jquery-accordion-init.js', 
						array( 'jquery', 'enqueue-accordion-script' ) );
}
add_action( 'init', 'add_jquery_accordion' );

For a good tutorial on how to load scripts, see scribu’s site.

Styling

That’s all you need to get a working jQuery accordion! You can now target the elements with CSS to achieve the desired look.
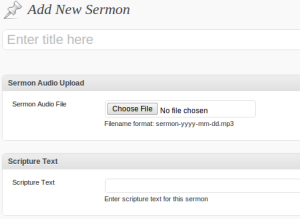
Custom Sermon Upload Interface

The main content of the sermon custom post type is the link to the MP3 file. When the post is displayed on the main webpage, it also uses an audio player plugin to get a cool flash based player right in the post itself. This is done from the backend with a shortcode. Other than the actual link to the uploaded MP3 file, the content should be identical.

Of course, this is best done by getting rid of the default editor, which leaves plenty of room for user error. I replaced the whole thing with a couple of meta boxes. However, editor support for the post is still needed. The trick is to use CSS to hide the editor interface, not to remove support for it entirely. I’ve explained this in a previous post titled “Hiding the Editor“.

The main interface now consists of just 2 meta boxes, one for the scripture text and the other for file upload. How to create a file upload meta box was explained in my previous post on Newsletter Creation.

All the user has to do now is to fill in all the boxes correctly and check the correct taxonomy items. The save() function from the meta box class will handle all the file processing and automatically generate the correct post content to get the desired output.

Since the same code handles both the sermons and the newsletters for both the English and the Chinese sites, it has to differentiate them all by the filename. Sermons get the audio shortcode and link in the post content, while newsletters are added by attaching them to the post. The theme files will then handle the display of newsletters. Although they can both be done by putting the data in post content, I hadn’t figured out how to hide the editor when I did newsletters, so I had to remove editor support and work around it by using the theme to display the metadata properly. This would have been unlikely to work for the audio plugin which uses a shortcode.

There is now a simple interface for adding both sermons and newsletter post types!

Hiding the Editor

The usual post editor can be hidden after all! Without removing support for it when registering the post type.

Add the following code to the constructor for the meta box class described in previous posts on creating custom meta boxes.

//hide editor if adding a new post of sermon type
		if( isset( $_GET['post_type'] ) && 'sermon' == $_GET['post_type'] ) {
			add_action( 'admin_head', array( &$this, 'hide_editor' ) );
		}

Add this as a function in the class.

	function hide_editor() {
		?>
			
				#editor-toolbar { display: none; }
				#editorcontainer {display: none; }
				#quicktags {display:none;}
				#post-status-info {display:none;}
			
		<?php
	}

The code for hiding the editor was taken from http://wordpressapi.com/2011/03/19/hide-wordpress-visual-editor-html-editor/

i18n

This post is on internationalization, specifically for the Chinese subsite. Those who have been following along will know that I have a custom post type for newsletters, and that this is displaying a link to the PDF file to be downloaded by getting the URL from the _wp_attached_file meta value. For the English version, it displays some text before the link (“Download MM: “). Obviously, this text should be in Chinese for the Chinese subsite. Looks like internationalization is a good way to achieve this.

Declare Theme Text Domain

Put this on top of the functions.php file.

load_theme_textdomain('theme_name', STYLESHEETPATH . '/languages');

Mark String as Translatable

The next step is to mark the ‘Download MM’ string as something to be translated. This is done by putting it in a special function __()

__( 'Download MM', 'theme_name' )

poEdit

This is a program which will get all the translatable strings out of the source code and create a .po file. It also provides an interface for supplying the translation and automatically generates the .mo file.

Rename Files

The final step is to copy the .po and .mo files to the theme’s languages folder (newly created). It is also necessary to rename them to zh_CN.mo and zh_CN.po so that the translated string would get picked up correctly.

Resources Used

The link on the WordPress Codex to the guides on the Urban Giraffe are excellent.
http://urbangiraffe.com/articles/translating-wordpress-themes-and-plugins/
http://urbangiraffe.com/articles/localizing-wordpress-themes-and-plugins/

Incorrect Download link for Subsites

Background

A custom content form for my custom newsletter post type wasn’t saving post content, thus my solution was to ignore the post content and generate it on the fly by getting the attached files instead. This worked beautifully in the main site, unfortunately, on the chinese subsite, wp_get_attachment_url returned something different.

Cause of Problem

It turns out that the _wp_attached_file meta value in the postmeta table is storing the full path to the link in the subsite. The corresponding value for posts in the main site only have the year/month/filename. They don’t contain the full domain name too. What this meant is that for the subsite, wp_get_attachment_url will add the domain to the front of the full link, thus generating an invalid link.

Solution

An email to the wp-hackers list had no responses, I’m not sure if it’s because nobody knows anything about it or whether the email got lost. Thus my solution is to filter the function output to strip out the extra baseurl which prepends the domain name. If this is necessary, the post meta is also updated so the next time this is needed, the correct output will be returned and there will no need to strip out the extra domain name again.

add_filter( 'wp_get_attachment_url', 'mbpc_wp_get_attachment_url_filter', 10, 2);

function mbpc_wp_get_attachment_url_filter($url, $postID) {
	$upload_dir = wp_upload_dir();

	//search through the url and see if it contains a 2nd instance of the baseurl
	$pos = strpos( $url, $upload_dir['baseurl'] , 1);

	if ( $pos !== false) {		//2nd instance exists
		$url = substr ($url, $pos);
		//update post meta so it won't have to find the substring on subsequent calls
		update_post_meta( $postID, '_wp_attached_file', substr( $url, strlen( $upload_dir['baseurl'] ) + 1 ));
	}
	return $url;
}

Newsletters for Subsite

Previously, newsletters on the subsite were put up with default Posts because I hadn’t done the necessary work for the subsite as well. However, to allow for a uniform admin interface, it makes more sense for the chinese newsletters to go up as ‘newsletter’ custom post types as well. Using phpmyadmin and SQL, I changed all the Posts in the subsite to newsletters.

Content Manager Rights

The whole idea is to let a layperson upload the weekly newsletters. This function already exists for the main site. However, to make it work for the subsite, I had to setup the Members plugin and roles all over again. Since everything is stored in the wp_options table, I just had to copy and paste the wp_user_roles option to wp_x_user_roles on the subsite, and copy and paste the members_settings option wp_options to the corresponding options table for the subsite. This has the effect of activating and configuring the members plugin with all the role types I had previously setup on the main site correctly configured on the subsite.

Newsletter Content Erased on Updates

A strangely blank newsletter post on the website brought this problem to my attention. When the newsletter custom content type is updated without a file selected for upload, the post content is erased. As this post type no longer supports the editor window, my guess is that the post content is never pulled from the database and displayed, so it’s just assumed to be empty on the update.

The first thing I tried was to force an insertion of the post content regardless of whether a file has been uploaded. However, this didn’t work. Although the post content did get updated correctly, the page seems to hang and finally just gives a server error. Not user friendly at all.

Examining the WordPress update and insert functions in detail led me to guess that it ends up in an infinite loop. wp_update_post() calls the save_post action. In my code, this calls wp_update_post(), which will then end up calling save_post again, and so on ad infinitum.

The solution I finally settled on was to modify the loop. Since the existing posts already use the post content to display the links, I kept that there for backward compatibility. However, if the post content is empty, the loop will get the children and generate the necessary HTML to display the download link.

Headers already sent

After successfully testing the new friendly newsletter creation page on my test site, I used SVN to update the theme on the live version of my site, all ready to try out the user friendly awesomeness.

Sadly, uploading files caused something similar to the following to appear.

Warning: filesize() [function.filesize]: stat failed for /usr/tmp/php5gl6gY in wp-admin/includes/ms.php on line 31

Warning: Cannot modify header information - headers already sent by (output started at wp-admin/includes/ms.php:31) in wp-includes/pluggable.php on line 897

A phpfreaks forum thread mentions that the user must have necessary permissions. As explained in an earlier post, I’m using the cgi-wrapper to run it as my own name, and thus it probably has no permissions for the temp folder and can’t run the filesize() function.

Poking into the code for ms.php, I saw that it does the file size check if the option ‘upload_space_check_disabled’ is false.

The checkbox which controls this setting is found in Network Admin -> Settings -> Site Upload Space. Disabling the check for user space allows the uploads to go through successfully.

Note that although a headers already sent error is shown, the files are still uploaded to the server.

File Permissions

I seldom go to the web host’s control panel as most tasks can be accomplished through SSH and its file transfer tool. While checking through to make sure that my automated post insertion program was running as expected, I noticed that media files uploaded through the WordPress admin interface were owned by the web server! This is bad because I would no longer be able to manage or delete the files. Although it’s unlikely that the files will be deleted, I should be able to do so if required.

Since there was nothing I can do about the file ownership, I raised a support request with pair.com. They were very efficient and replied in just a few hours. The rogue file were restored to my username and I can now delete and modify them. They also provided a solution to solve the problem of WordPress uploads coming under the ‘nobody’ user. That involves using a cgi wrapper to run PHP under my own username. They helpfully provided a link to the instructions.

Once I had that setup, I tried uploading a file and found that it is indeed under my own username. Another problem solved.